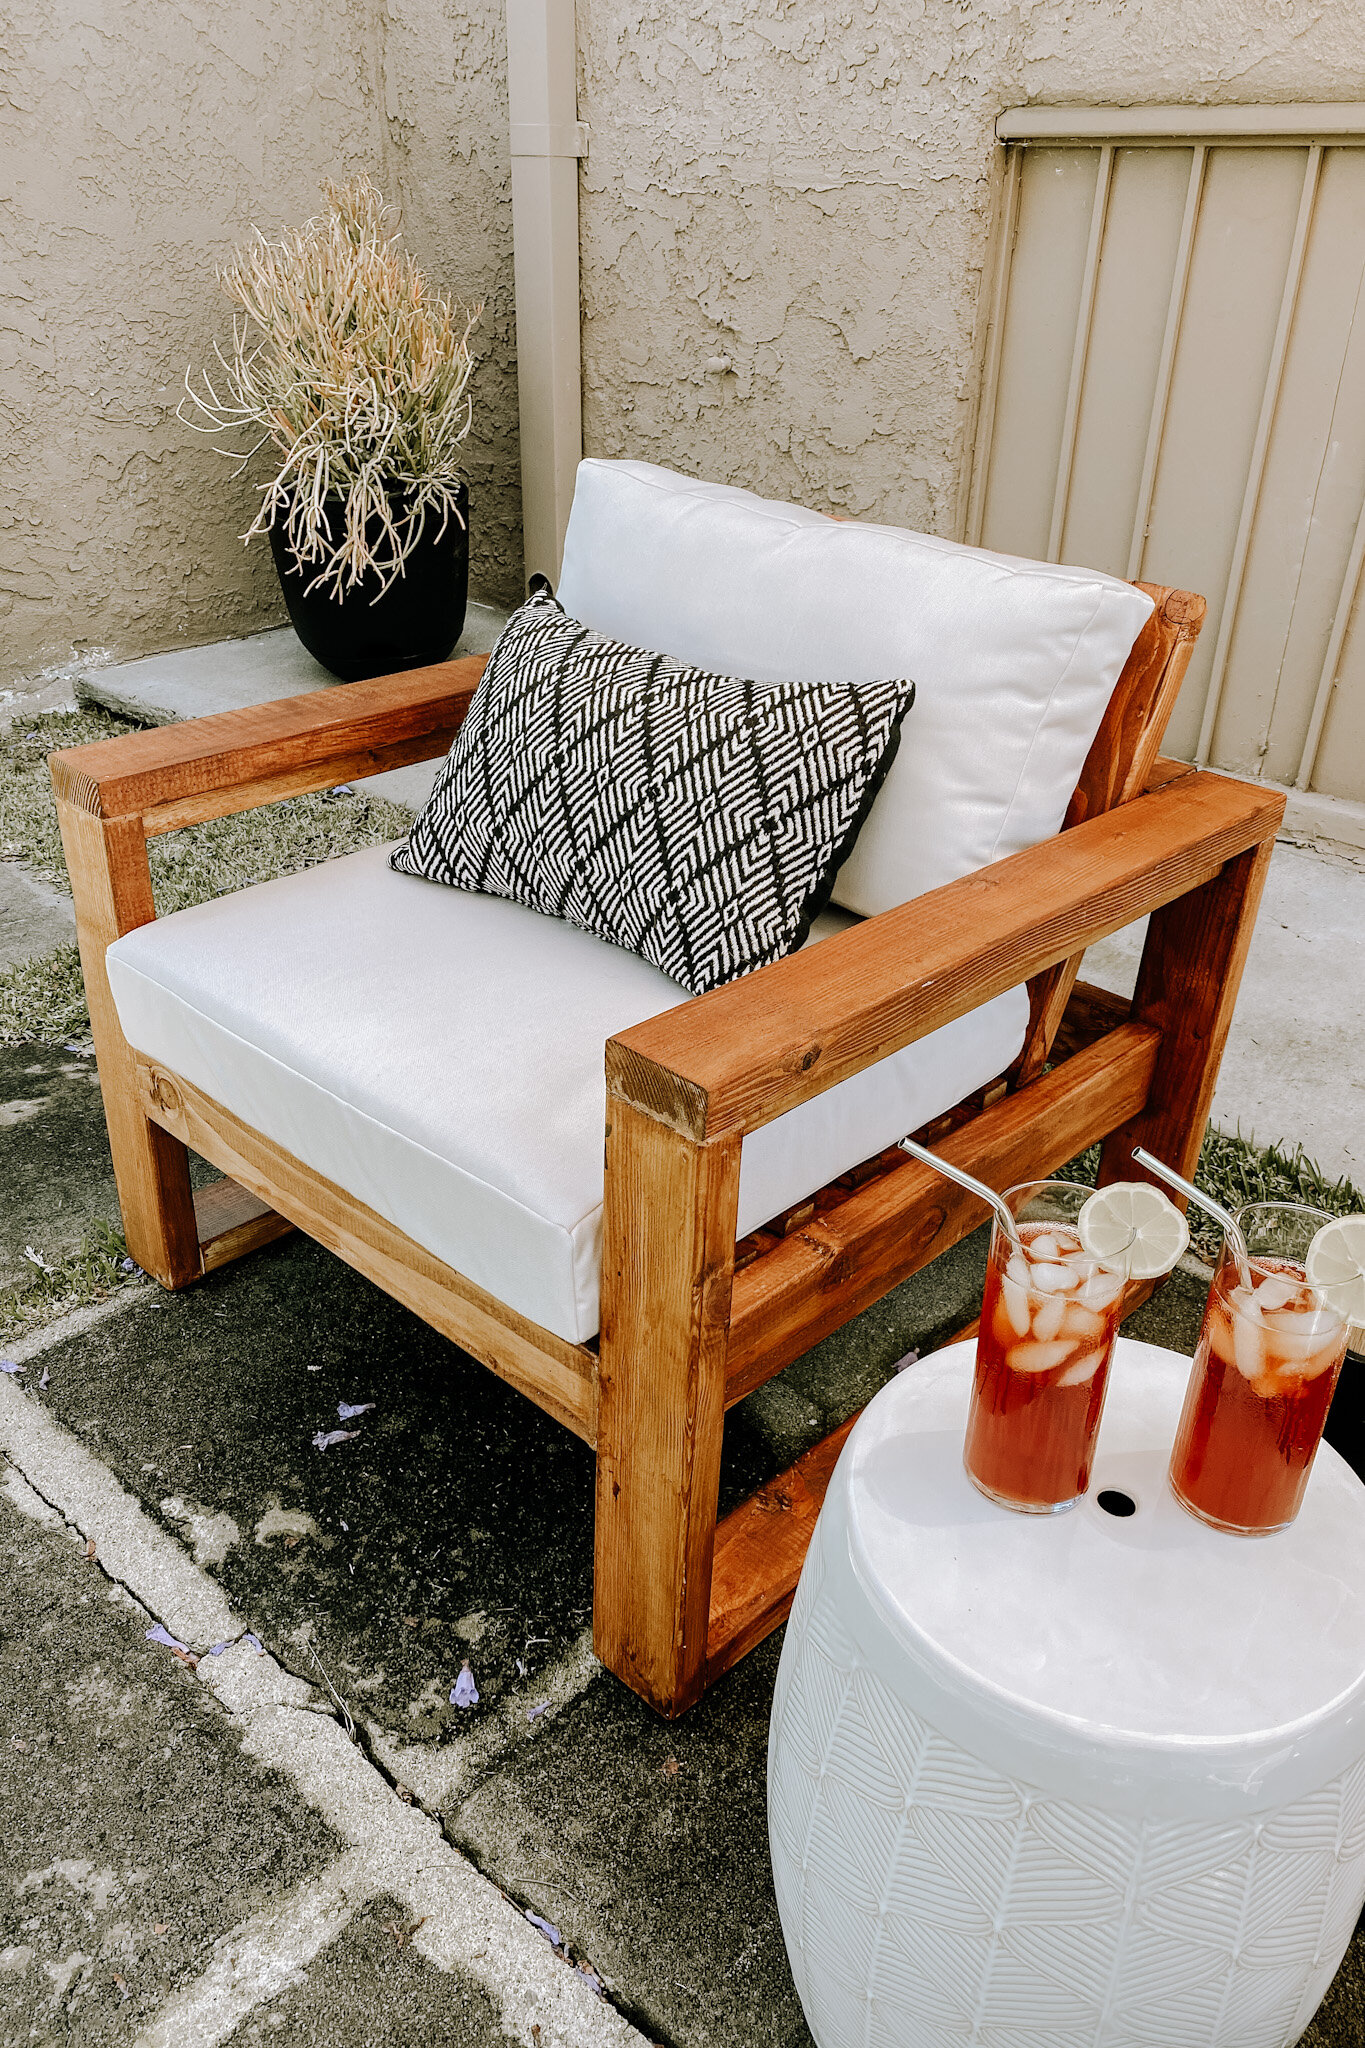
DIY Patio Chairs

Spring has finally arrived and that means more daylight and warmer weather! I couldn’t think of a better way to welcome the season than with an outdoor DIY. Just imagine it’s a beautiful Spring morning and you step outside to have your morning coffee in a beautiful patio chair you made… YOURSELF! Well, I’m here to make that a reality for you with this DIY Patio Chair tutorial.
INSPO

While searching for inspiration, I loved this patio chair style I’ve seen at both West Elm and Restoration Hardware. Its low, boxy shape and wide seat cushion make it perfect for putting up your feet and getting comfortable. The price to buy new patio chairs like these was quite expensive so I was determined to design my own for an affordable price.
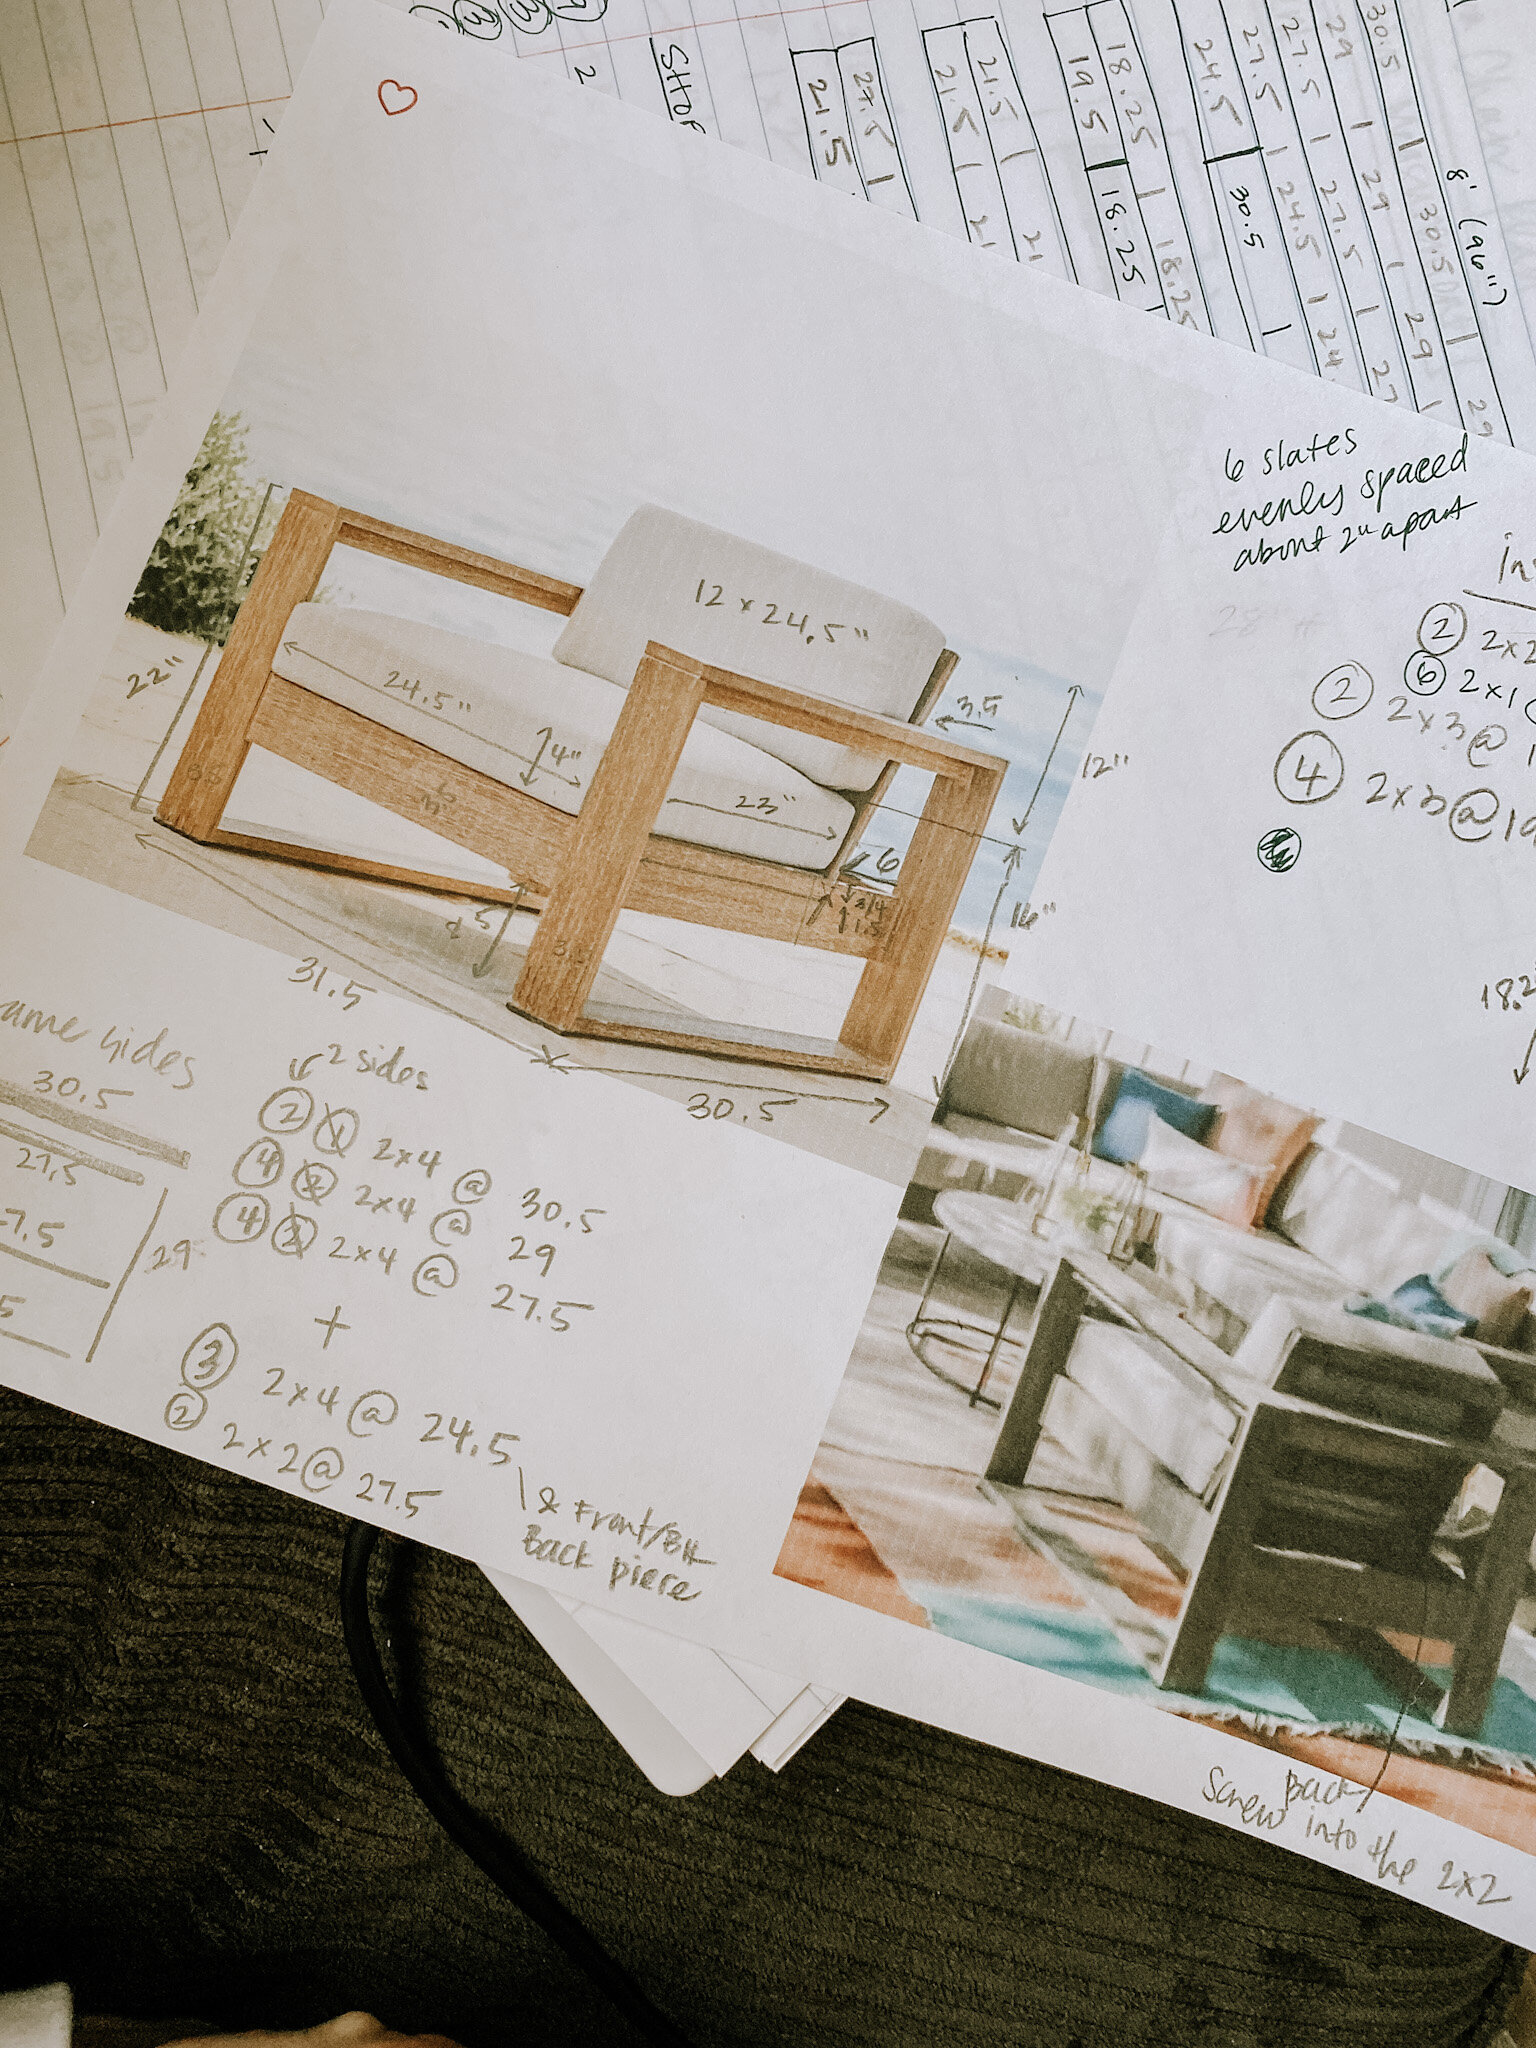

I was definitely a novice when it came to woodworking as this was the first wood project I’d done that required so much planning. BUT I live by — anything is possible if you just try!! I’ll have all the tools, supplies and measurements you’ll need to make this DIY project as easy and comprehensible as possible. YOU GOT THIS!
LET’S GET STARTED
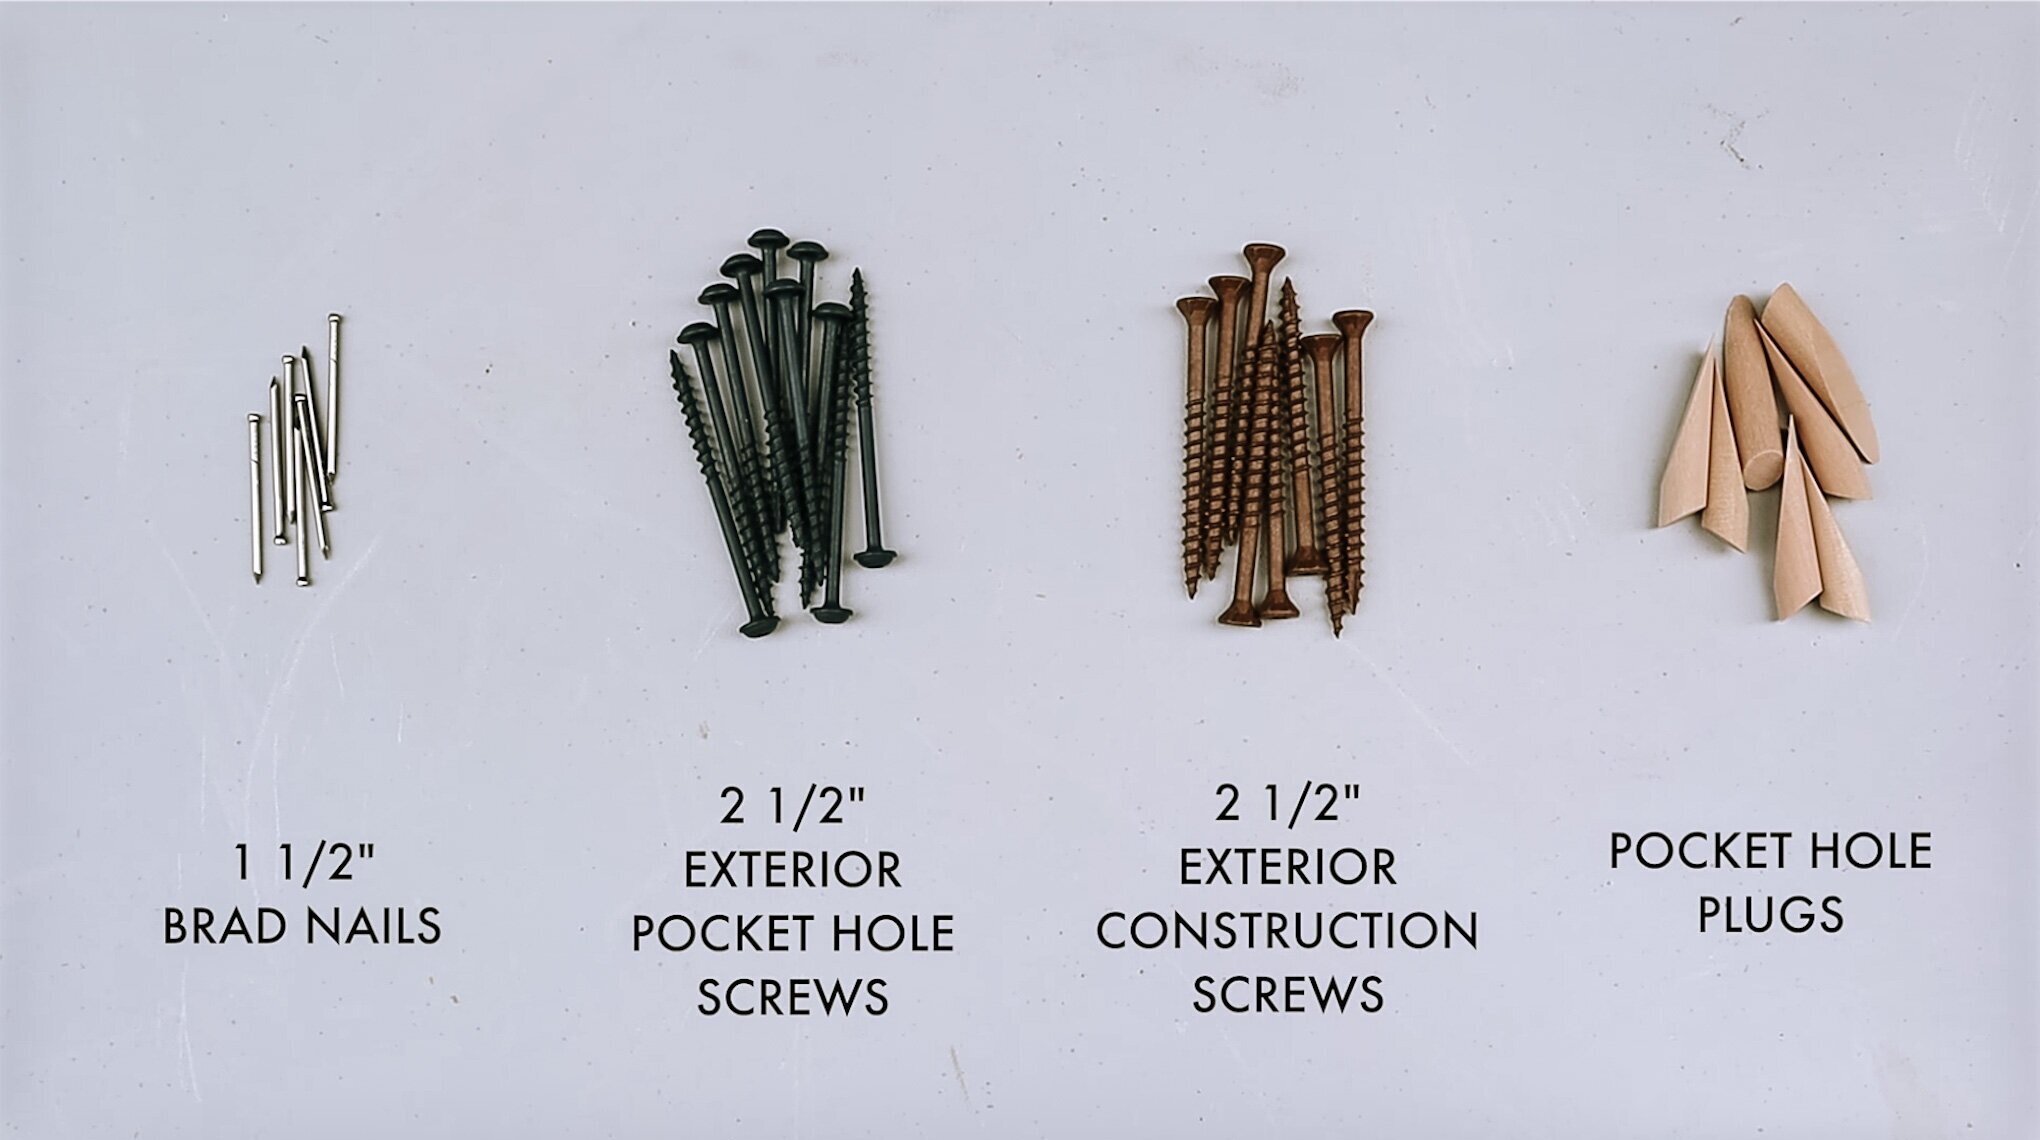
Here is all you’ll need to make ONE chair. Make sure to double the number of materials needed if you want to make a set of chairs.

BUILDING THE CHAIR FRAME
STEP 1 - Cutting wood
Taking a measuring tape and circular saw - cut all the wood pieces for the chair frame to size. (Keep a saw handy as we will need it to cut chair bottom and backrest pieces later on)
2 pieces of 2x4 wood - CUT AT 30.5”
4 pieces of 2x4 wood - CUT AT 27.5”
3 pieces of 2x4 wood - CUT AT 24.5”
4 pieces of 2x4 wood - CUT AT 20.5”
2 pieces of 2x2 wood - CUT AT 27.5”

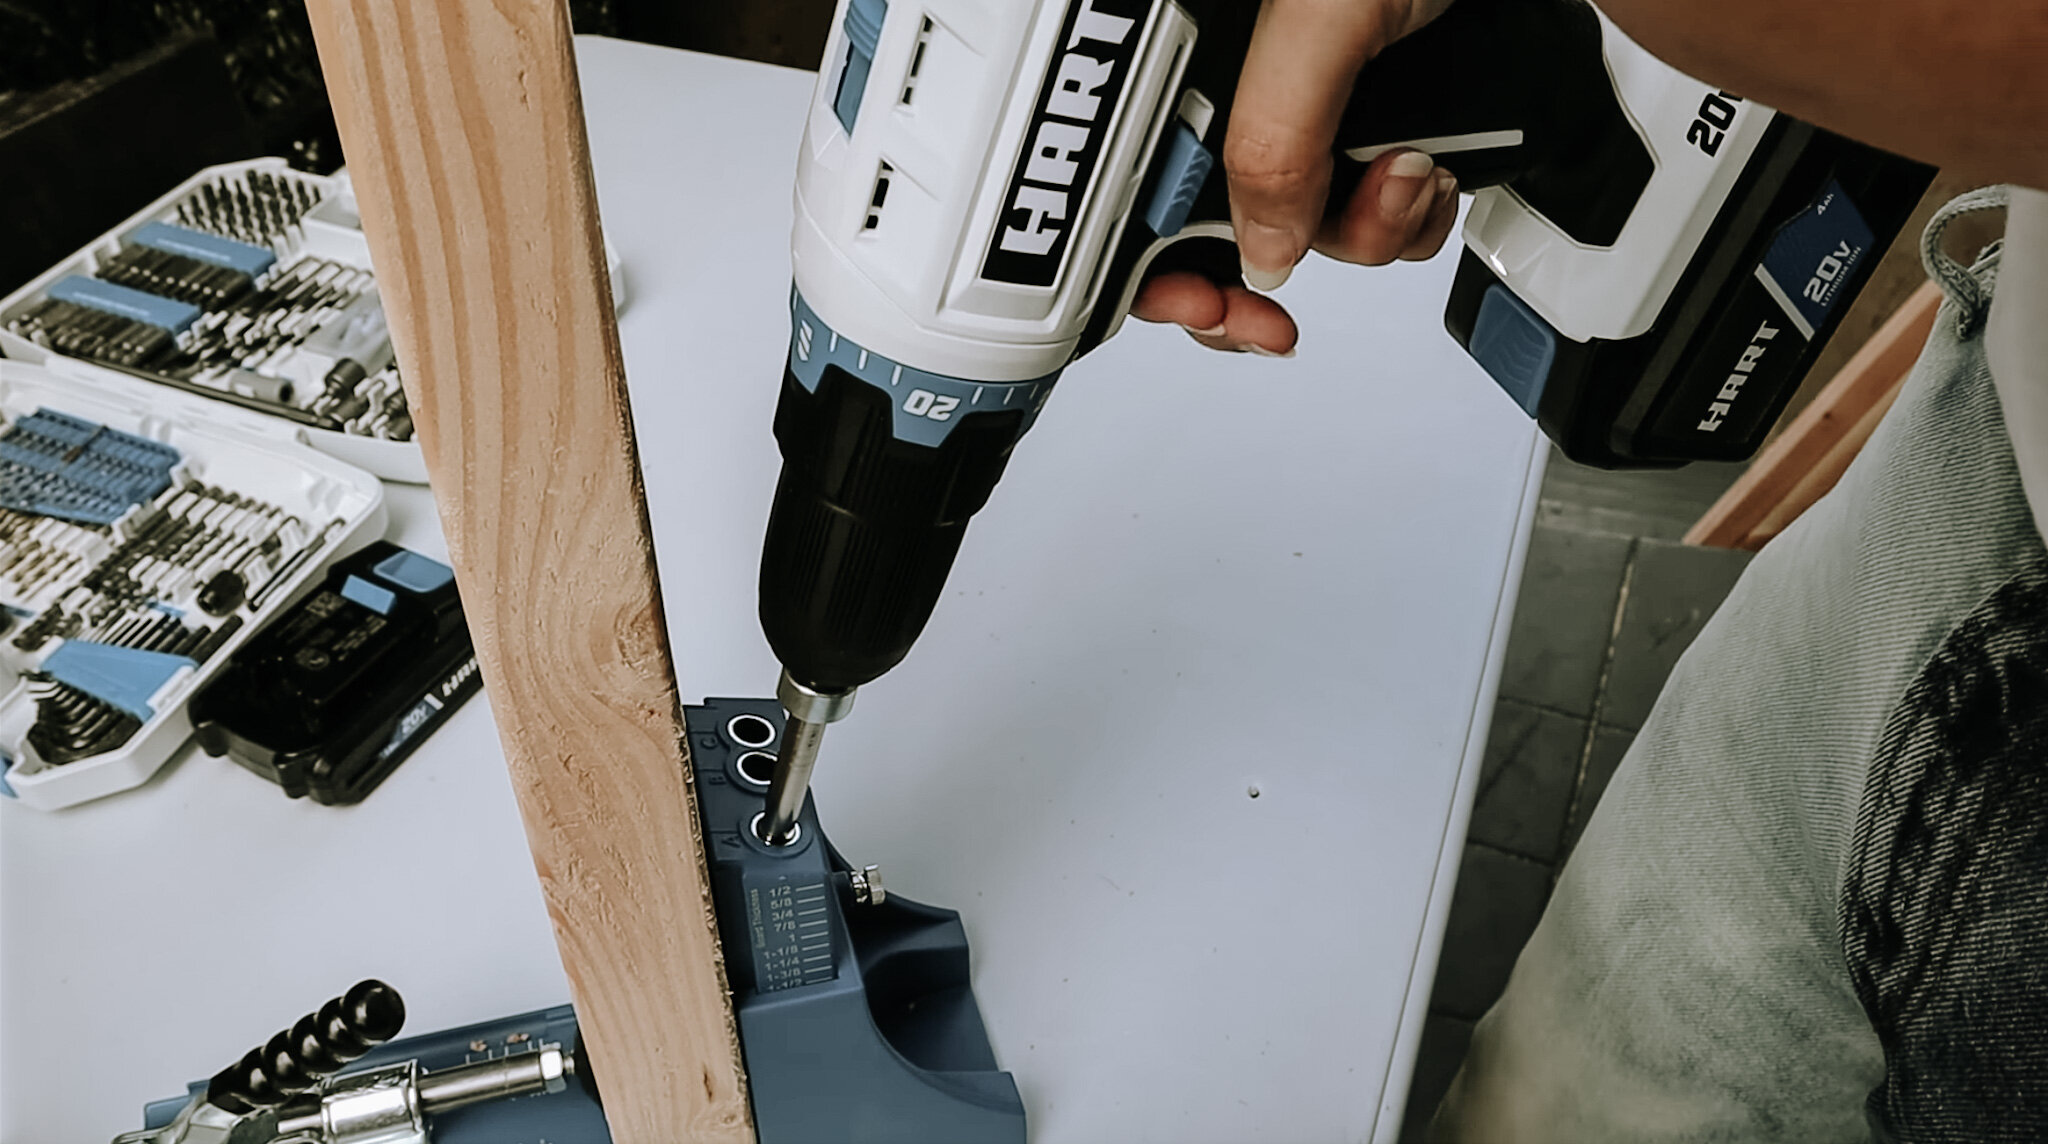
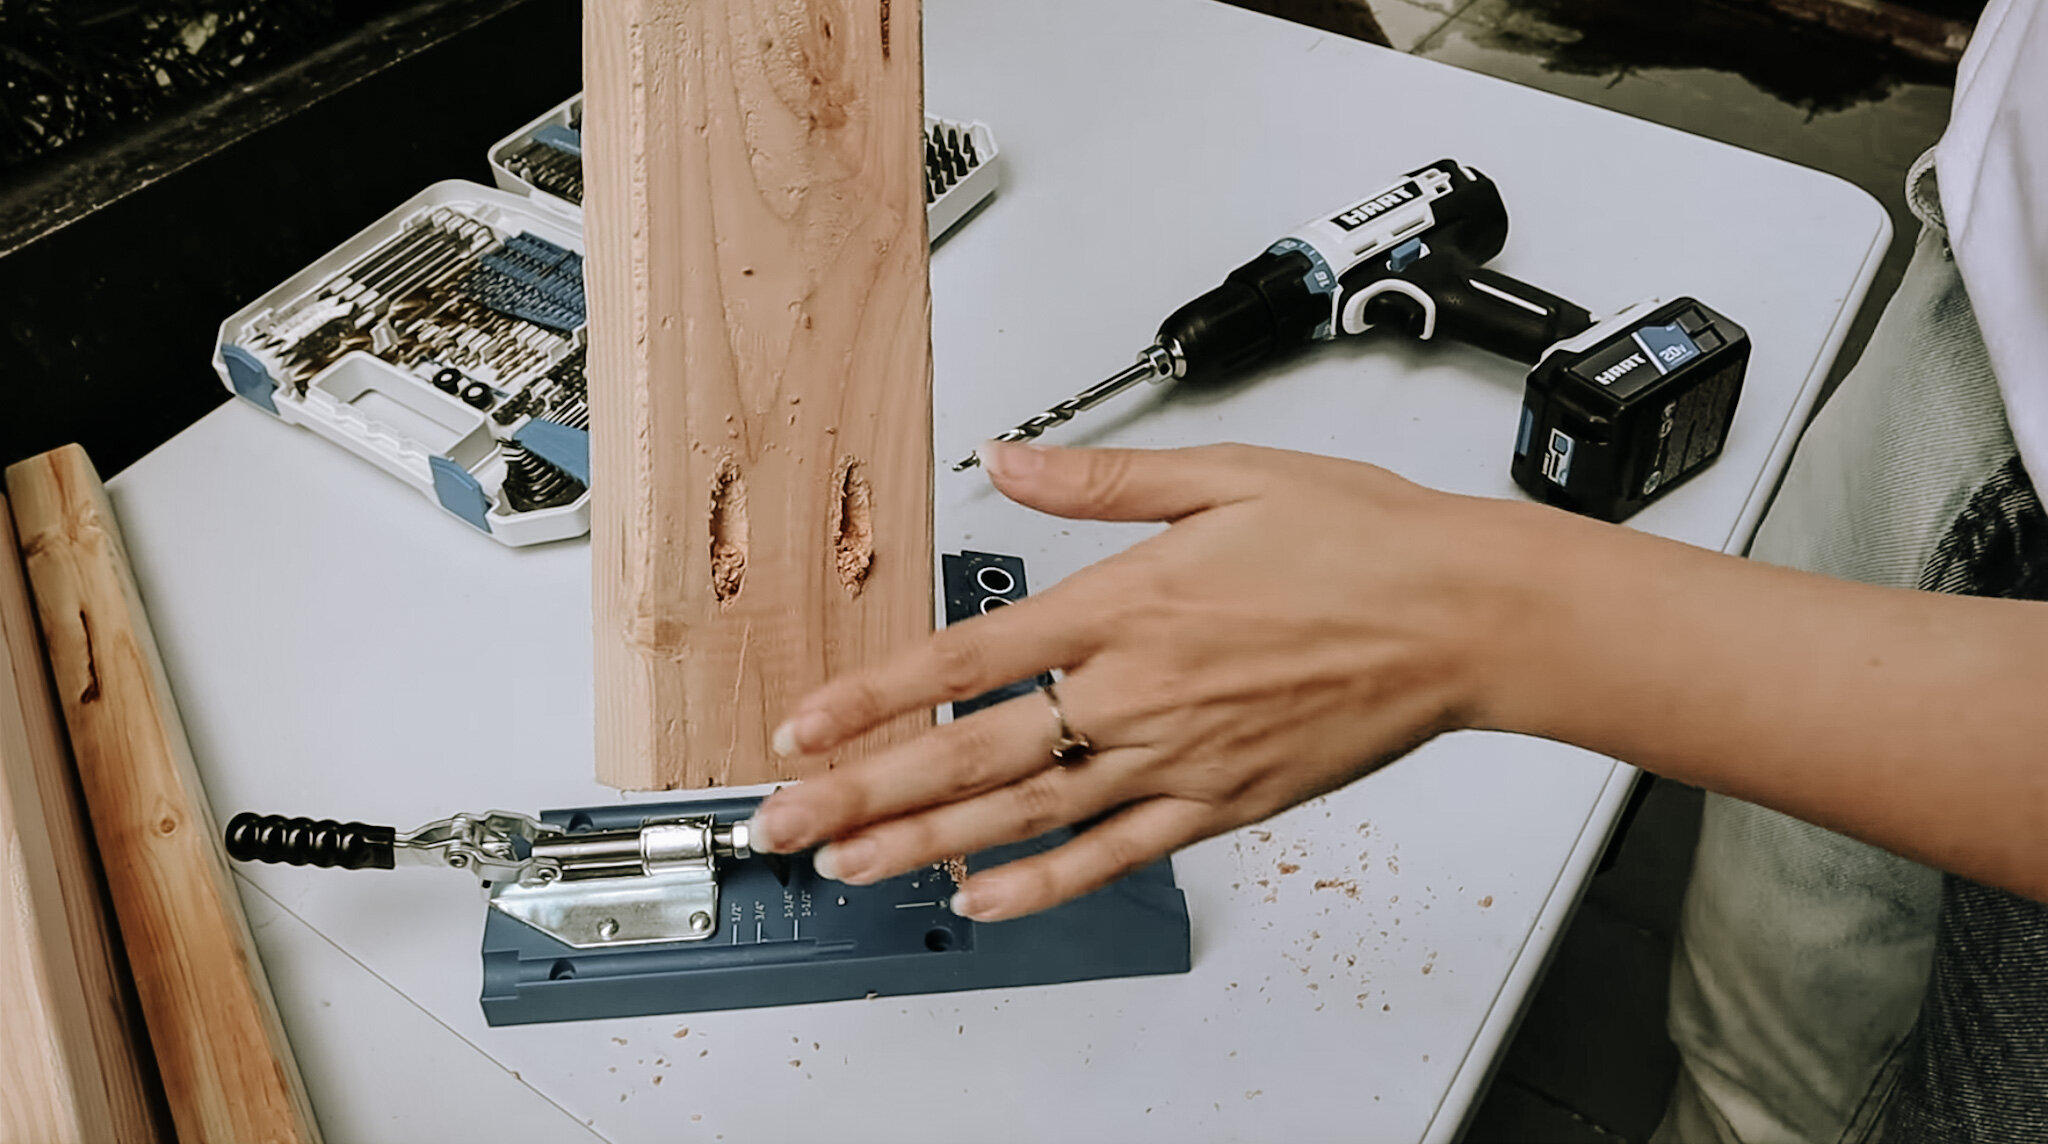
STEP 2 - Drill pocket holes
All the 27.5” and 24.5” pieces we just cut need pocket holes so that we can assemble the chair together.
4 pieces of 2x4 @ 27.5” - NEED 4 POCKET HOLES (all on one side - 2 at each end)
3 pieces of 2x4 @ 24.5” - NEED 4 POCKET HOLES (all on one side - 2 at each end)
2 pieces of 2x2 @ 27.5” - NEED 2 POCKET HOLES (all on one side - 1 at each end)
For the (4) 2x4 pieces of wood use a drill (drill bits) and pocket hole maker and drill down on A and C on the pocket hole jig. This will create 2 evenly spaced pocket holes.
Next, take the (2) 2x2 pieces and drill one pocket hole at each end on the B setting. Since this is a smaller piece of wood we only need 1 hole at each end.
Tip: Make sure the pocket holes are made at each end on the same side of the wood.

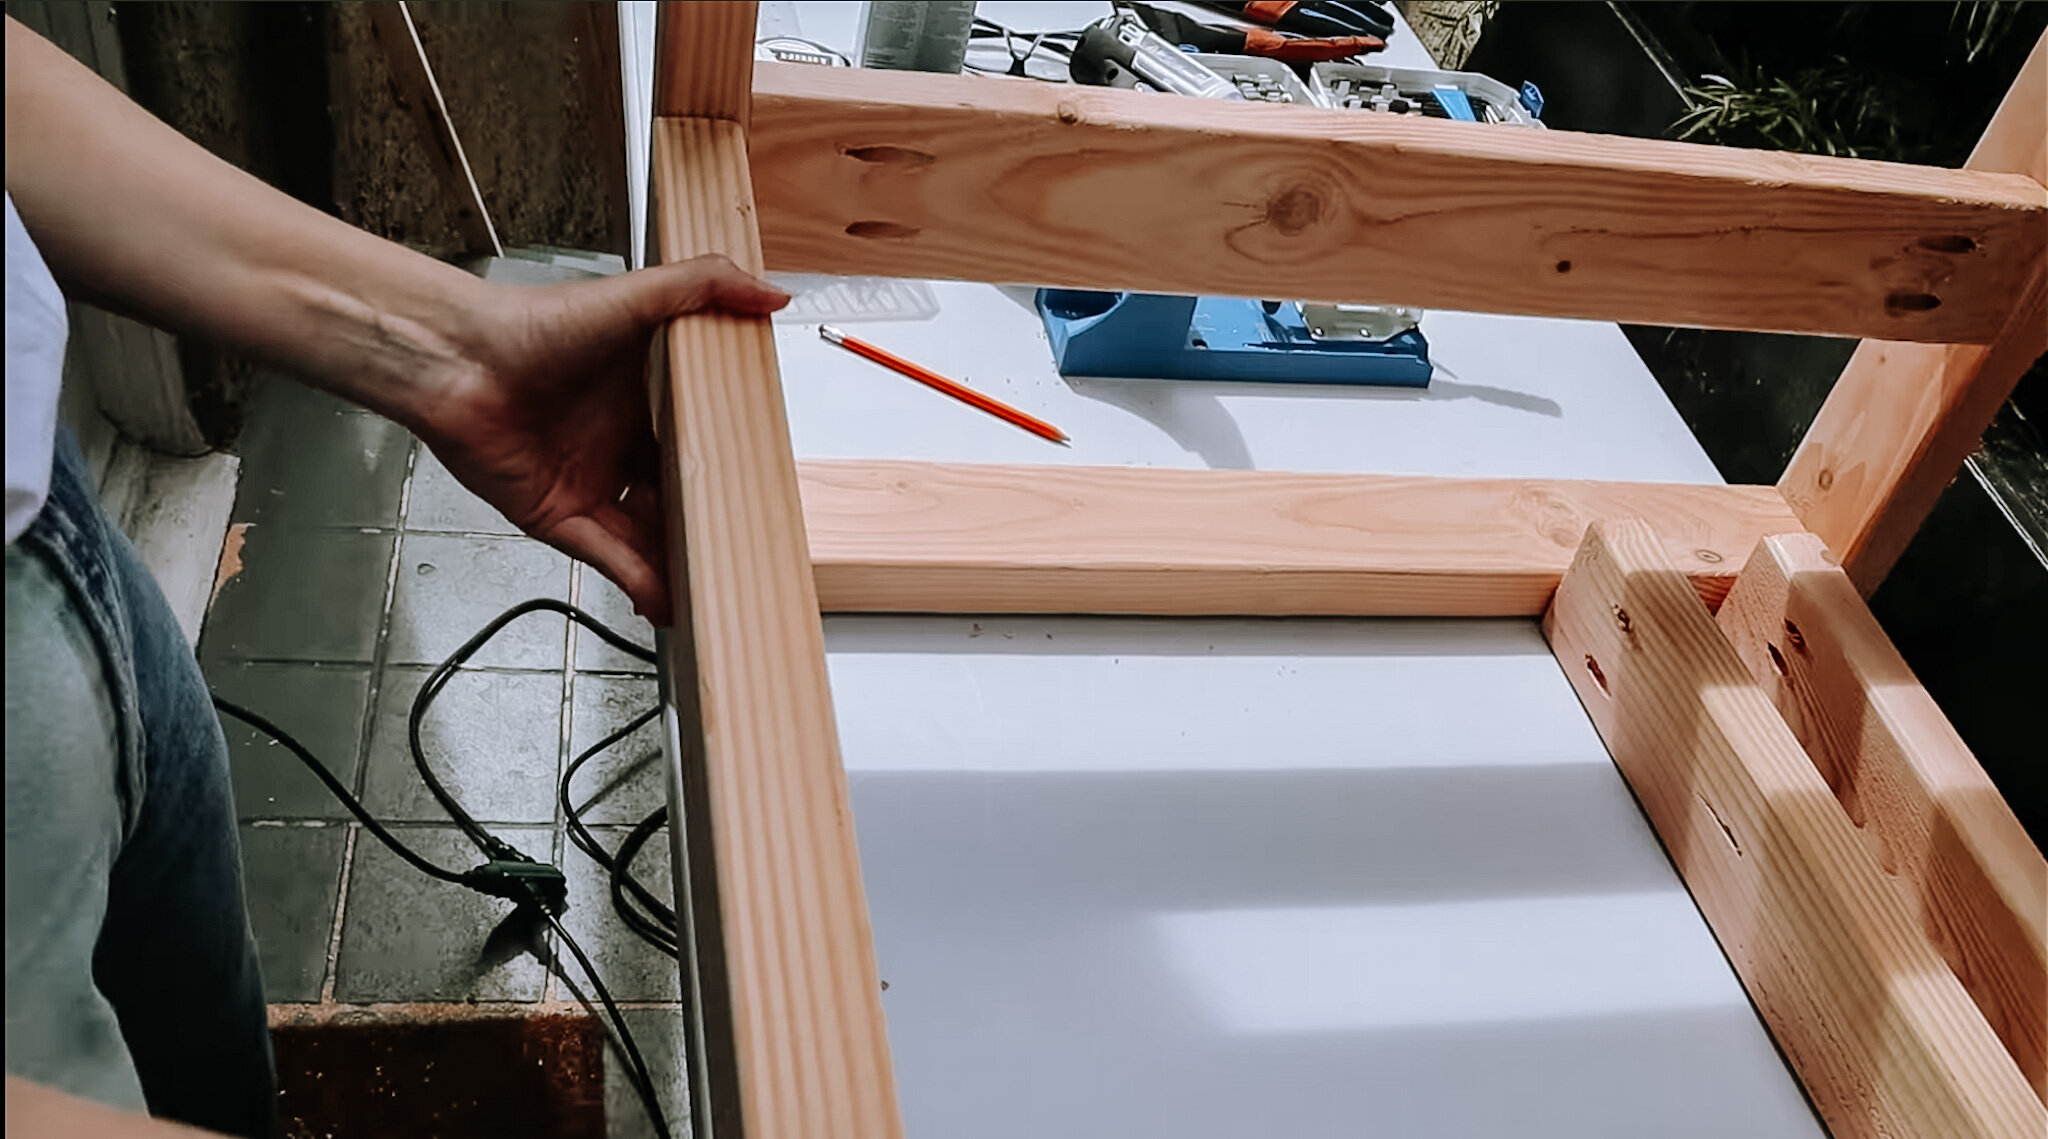
STEP 3 - Lay out the pieces
I like to lay out the pieces before I drill— just to make sure everything was measured and cut correctly! Here are the pieces you’re going to need for ONE side of the frame from top to bottom:
(1) 2x4 at 30.5” - Arm rest
(2) 2x4 at 20.5” - Sides
(1) 2x4 at 27.5” - Center piece (pocket hole facing in where the cushion will be)
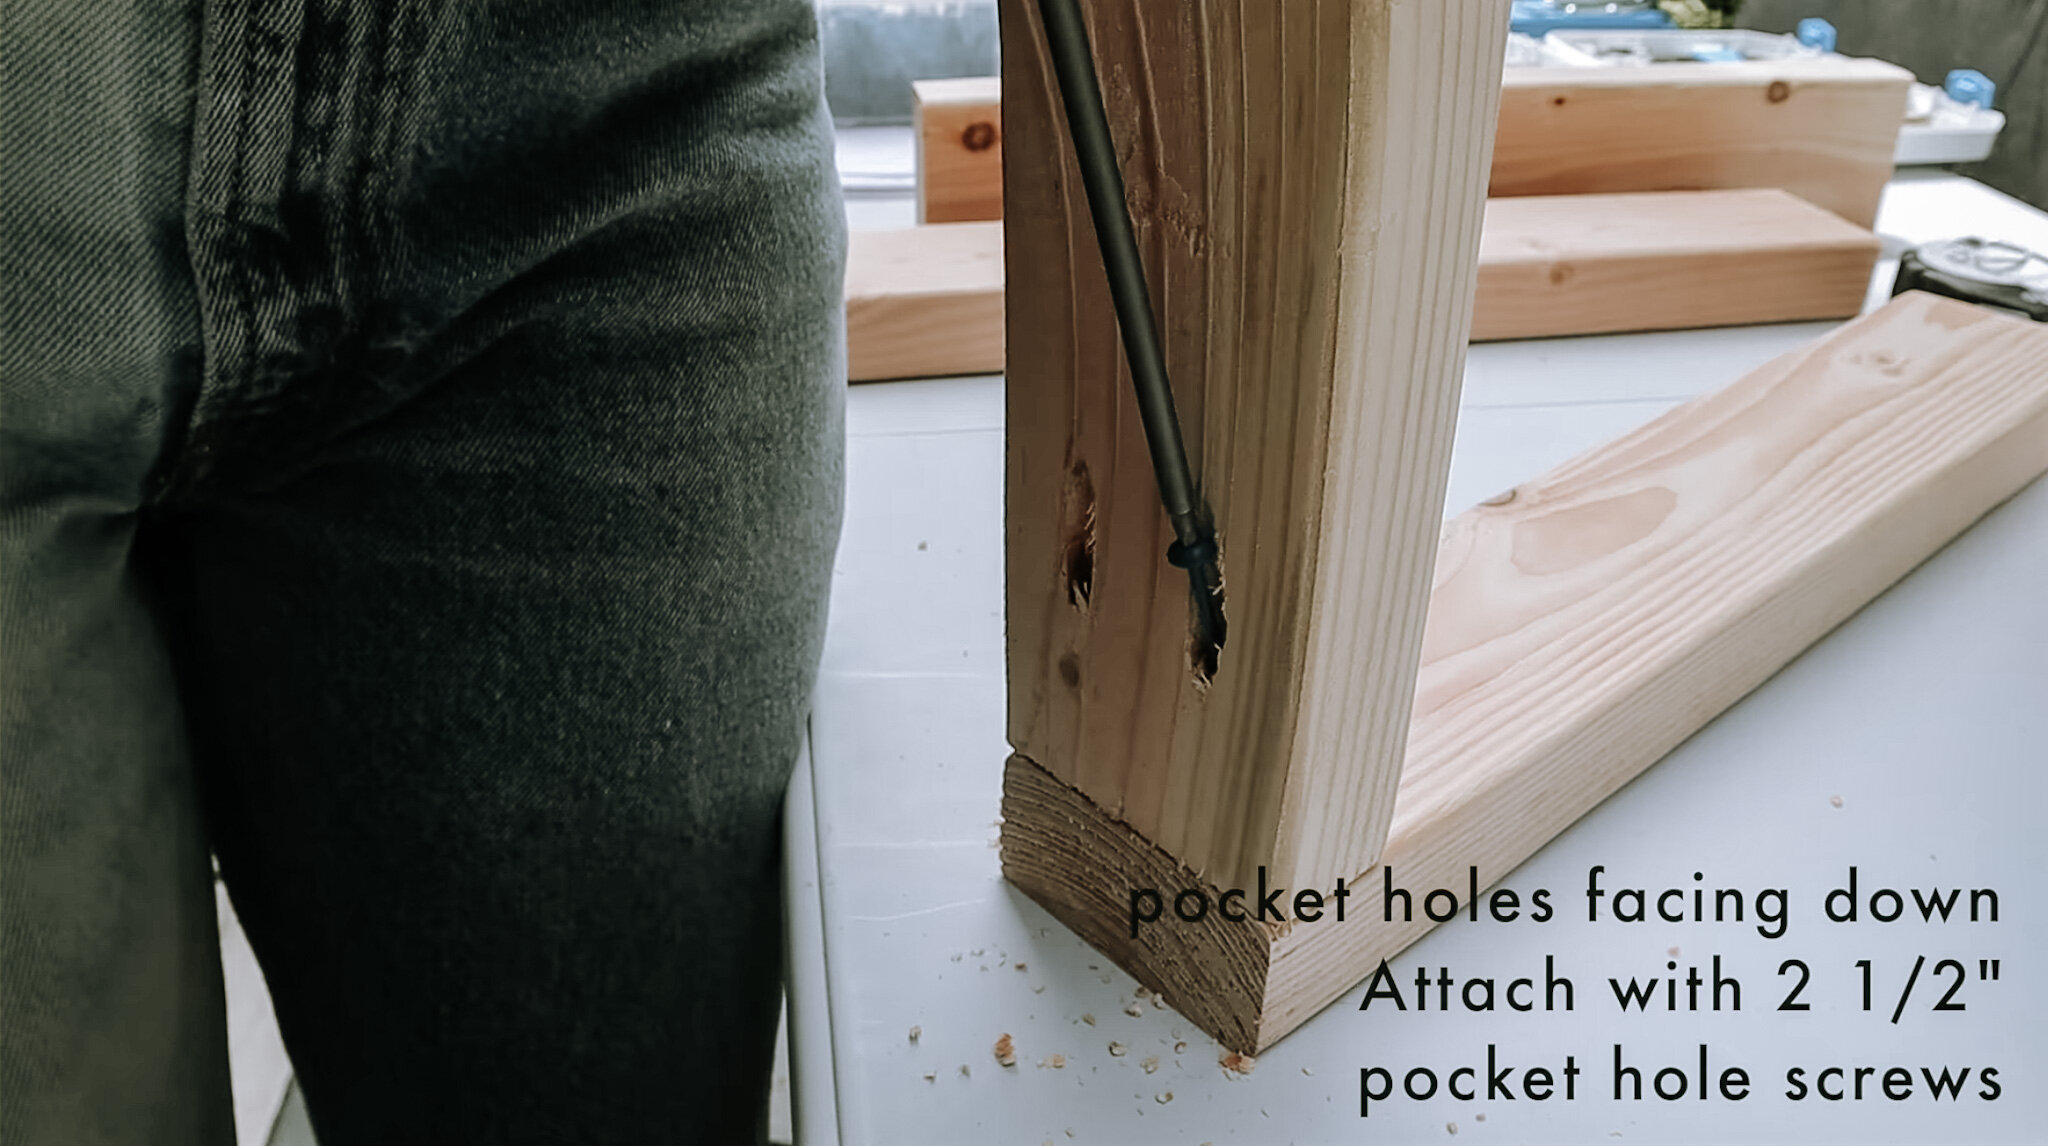
(1) 2x4 at 27.5” - Bottom piece (pocket hole facing down) Note: I have it the wrong way in the photo below. the holes should face down so you never see them once the chair is completed
(1) 2x2 at 27.5” - Extra support for the arm rest and sides (pocket holes facing down)

STEP 4 - Build the frames
Here is a list of all of the hardware needed to attach the pieces together.
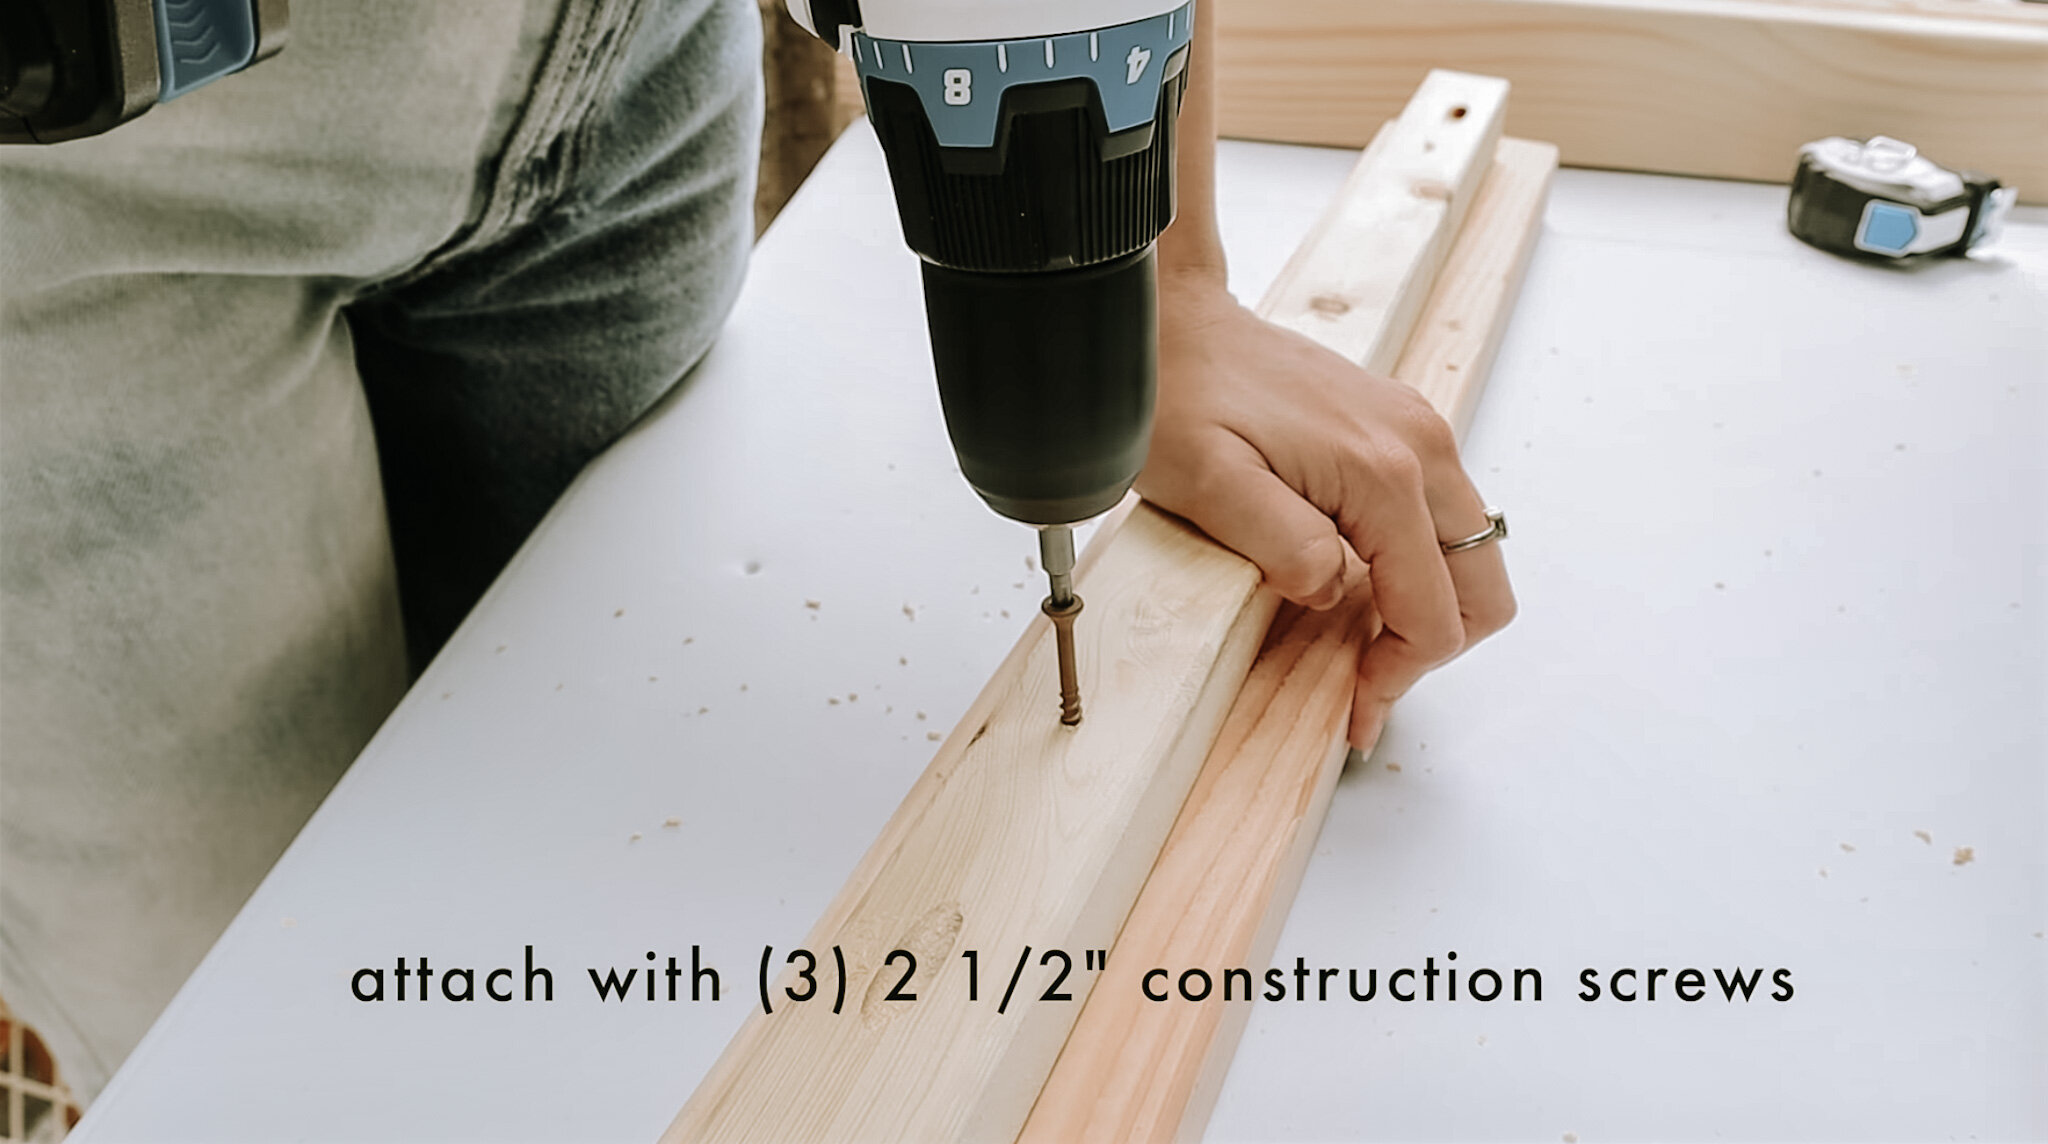
First, attach the armrest (30.5” - 2x4) to the (27.5” - 2x2) brace using (3) 2.5” construction screws. Make sure the 2x2 piece is centered both width and lengthwise on the armrest piece. Drill the construction screws through the 2x2 into the 2x4 to attach it. No exact measurement needed just evenly spaces between the pocket holes.


Next, attach bottom and the middle piece (27.5” 2x4s) to the side piece (20.5” 2x4) with 2.5” pocket hole screws. The middle 2x4 is part of the seat and is positioned 8.5” up from the bottom.
Next, do the same thing to the other “side piece” (20.5” 2x4), and use pocket holes to attached the arm rest brace as well to complete the frame


STEP 5 - Attach the left and right frames together
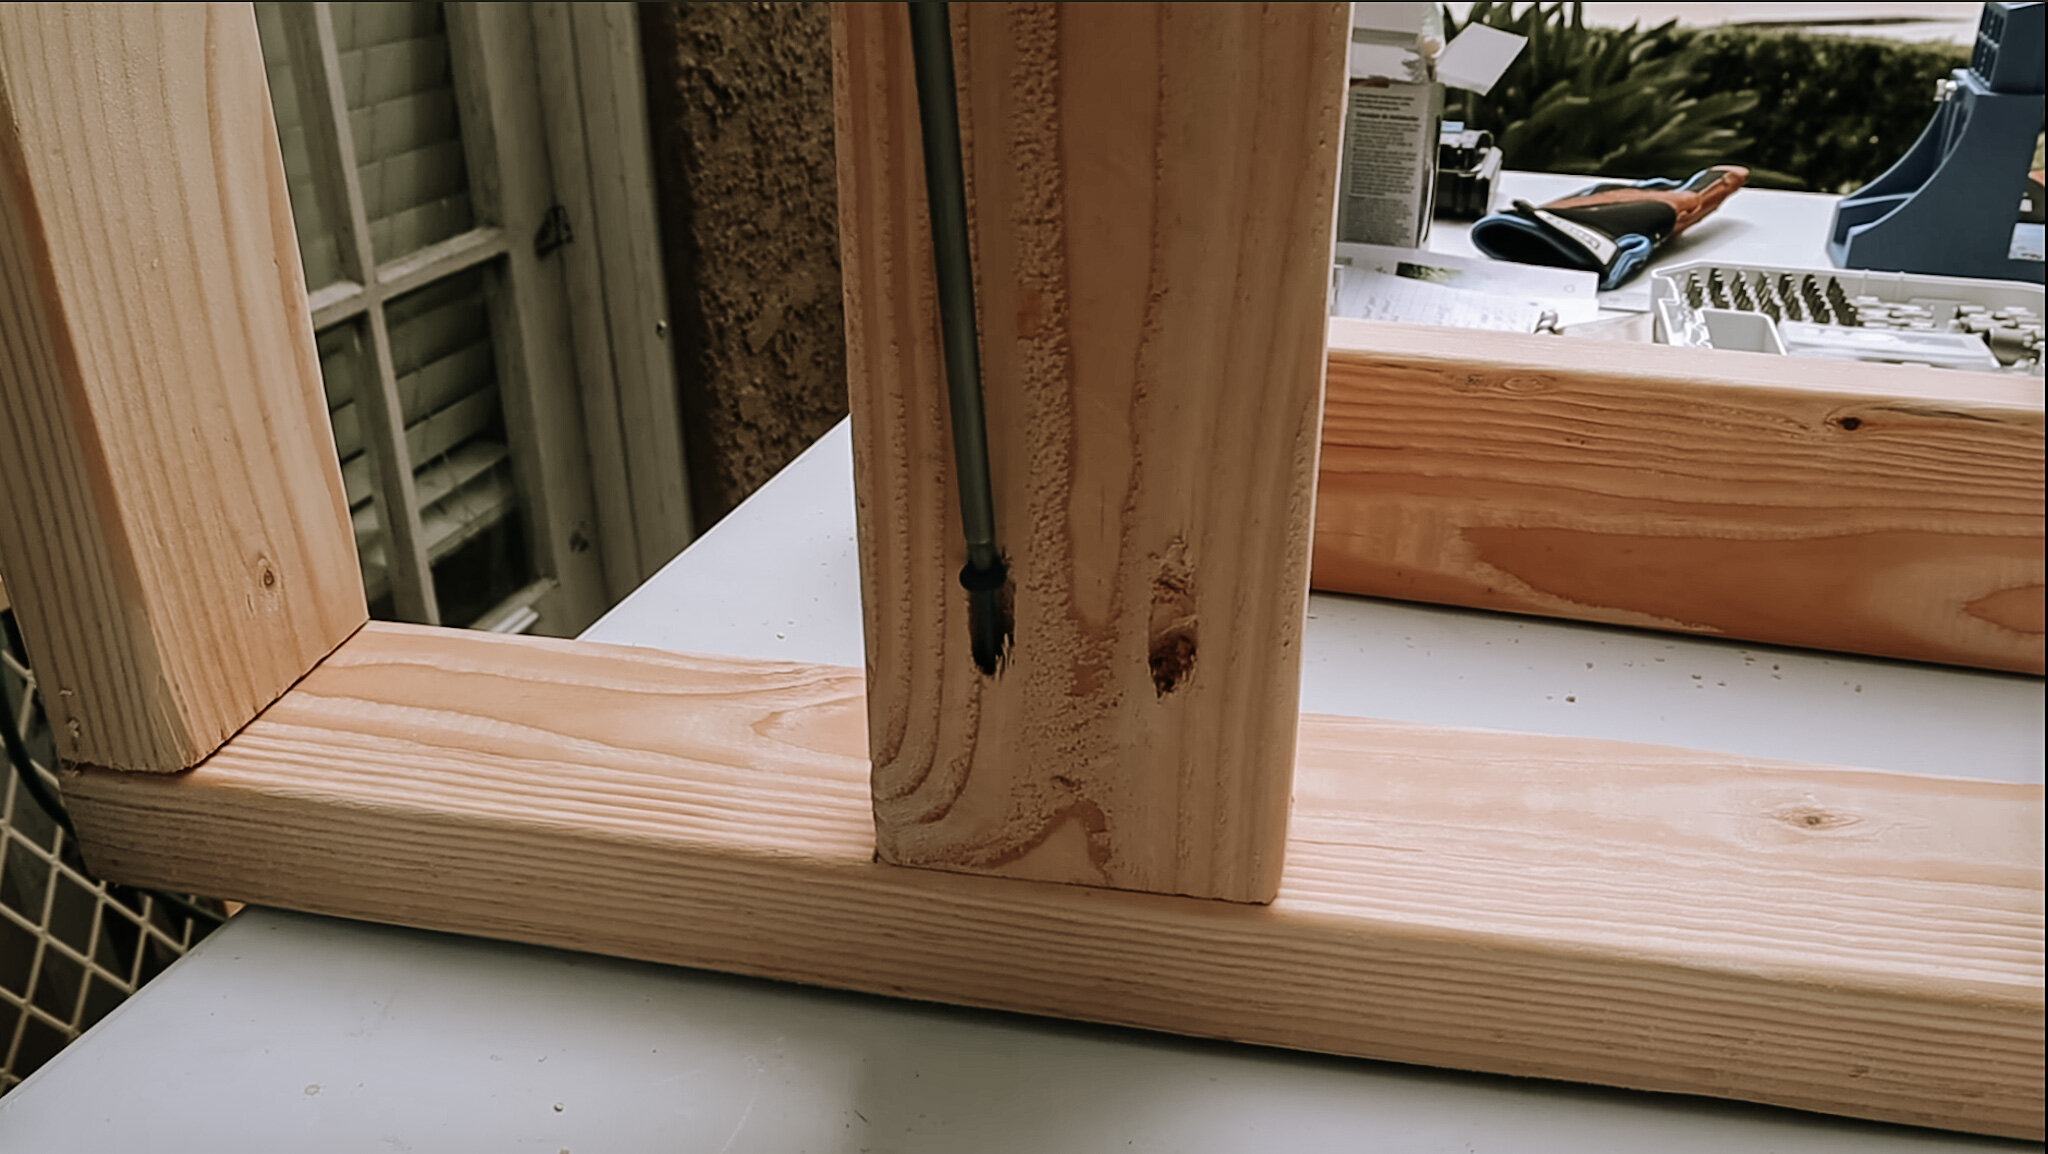
Once both side frames are complete, it’s time to attach them together using the (3) 2x4s at 24.5” with pocket holes facing down and in.

Two of the pieces will be used to complete the seat frame (8.5” up from the bottom) at the front and back.(pocket holes facing into the square so its covered with the cushion) The third piece positioned at the TOP / BACK to create a continuous flat “U” shape around the top of the chair.
The chair frame is complete! YAY!


ADDING THE SEAT BOTTOM
STEP 6 - Cut the wood
Next, cut the wood pieces to make the seat bottom.
2 pieces of 2x2 wood - CUT AT 21.5”
6 pieces of 1x2 wood - CUT AT 24”

STEP 7 - Assemble
Locate the front of the chair and then the middle seat 2x4s that are 8.5” from the bottom. The 2x2 pieces of wood will be positioned inside the seat 2x4s — 3/4” down from the top edge of the 2x4 and shoved all the way to the front of the chair. This will create an empty space at the back of the 2x2 piece. To attached use 2.5” construction screws and drill through the 2x2 into the 2x4s to attached. No exact measurement for this just evenly spaced and secure.

Next, take the (6) 1x2’s and hammer them into the 2x2’s with 1.5” brad nails. Simply evenly space them along the 2x2 piece of wood. This will be where the seat cushion sits.
NOTE: Leave 3/4” space at the back of the 2x2 to attach the backrest.

MAKE THE BACKREST
STEP 8 - Cut the wood
Here’s the wood and measurements needed to make the backrest.
4 pieces of 2x3 wood - CUT TO 19.5”
2 pieces of 2x3 wood - CUT TO 18.25”

STEP 9 - Drill pocket holes & Assemble
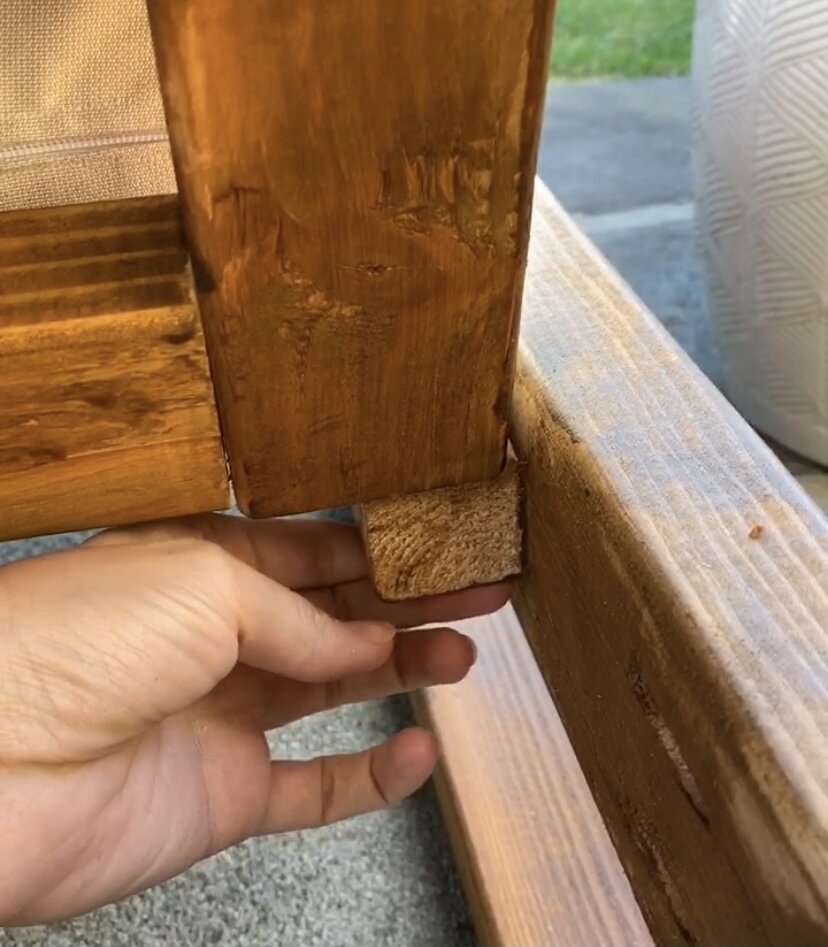
First, drill pocket holes on all 4 of the 2x3’s. Next, layout the backrest design - one 18.25” on each side and four 19.5” across the middle with pocket holes facing up. Using pocket hole screws attached the 4 middle pieces to the two side pieces. For a clean finish, cover the pocket holes using wood glue and pocket hole plugs and give those areas a good sanding!


Finally, attach the backrest to the chair. I also wanted the backrest to slant back for a more relaxed feel. Sit the backrest on the remaining 3/4” space at the back of the 2x2 piece of wood at the back of the seat AND then lean it back to the back frame. Using 2 1/2” construction screws, drill up from the bottom of the 2x2 into the backrest to attached. (pictured below)


STEP 10 - Stain
Prep the chair before staining it by using a stainable wood filler anywhere you see imperfections or gaps. I used an exterior stain by Valspar in the color Canyon Brown and I absolutely love the finish. It was the perfect wood tone I was looking for.

STEP 11 - Add cushions
All the measurements for the chair are based on the cushions that I bought at Walmart. They were the perfect size and depth but they didn’t have them in the color that I wanted. So I used the cover as a pattern and made my own cushion covers! For an in-depth tutorial on how to make the cushions, watch the entire YouTube video here!


This DIY was so much fun and I hope I’ve inspired you to make your own patio chairs this spring. Watch the video below to see my build them and comment if you have any questions!
XO, MaCenna